How to Use Zoom- 10 Unexpected Zoom Tricks That Will Save Time, Save Money, and Wow Your Clients
With the recent obvious necessity of online video conferencing. You may have loads of questions about how to use Zoom, or people looking for Zoom tips and tricks. More and more business owners have realized that they need to get their businesses online, or they are literally going to be left behind.
Whether you are a coach, a studio owner, or simply someone who is looking for a way to continue to create community for your customers and clients, Zoom is an amazingly powerful tool. On client calls I often hear… how did you do that?
I’ll joke and say… Magic!
But, honestly, most of the Zoom tips and tricks I use to save time and money, are super easy… if you know what they are. ?
In 2013, I started my business as a musical theater and singing coach. When Facebook Live came on the scene in 2016, we switched everything!
Rather than teaching performers to build their businesses, we started teaching business owners to perform, AND decided to take everything online with our Camera Confidence and GLAM (Go Live And Monetize Programs).
Since then, zoom has allowed us to take our business to 7 figures, and a team of close to 10 amazing humans.
I recently did a video walking through my favorite secret strategies for both video conferencing and going live. In this post, you’ll discover strategies I shared in this video, which will allow you to save time, money, and make your clients and customers say… OMG! HOW DID YOU DO THAT!
To make things easy, I’m going to share what works for a Pro Account which currently costs $14 a month. I’m telling you, it is one of the best investments I’ve made in my business… and waiting to upgrade will only cost you more time and energy.
You can do a lot of this without the pro account – but you may have to use crazy work arounds.
Let’s dive in…
How to Use Zoom: 10 Unexpected Zoom Tricks that Will Save You Time, Save You Money, and Wow Your Clients
Set up a Recurring Meeting – This will give you the same link every time.
First, let’s talk about the difference between your “Personal Meeting Room” and a new or recurring Meeting.
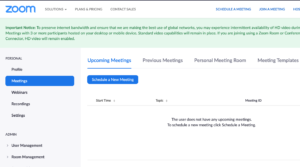
If you go into settings and then “Meetings” you’ll see this.
I’m often asked, what is the difference between a Zoom Meeting and a Zoom Personal Meeting Room?
Here’s how I look at it.
Your “Personal Meeting Room” Is something that can be open and ready for anyone at any time. Depending on your settings. The link is always the same.
Your Meetings are scheduled at a specific time and will require a specific link or meeting id.
If you schedule a Recurring Meeting or a recurring Webinar (with the upgraded webinar plan) you can create a specific forwarding link that goes only to that specific meeting room.
Why would you want to use a recurring meeting instead of just forwarding everyone to your open Personal Meeting Room?
When you use a Personal Meeting Room, anyone can jump in at any time. I’ve had some awkward moments both as a host and as a guest. So setting specific meeting times, is a great way to keep everyone in their own “room.”
I personally use the Personal Meeting Room more than anything else, and I lock the room so that no one else can enter. (You’ll see that tip below.) But for our weekly GLAM group coaching calls, we have a specific link that leads right to that call so that everyone is going to a clean room and we reduce confusion.
Use a Forwarding Link so your Zoom Meeting link easy to remember and share.
When asking “How to Use Zoom” many wonder how to easily keep track of the invite link.
I highly suggest using a forwarding link, as some call it, a “vanity url.”
You can create this easily with a tool like Rebrandly, or with the WordPress Plugin called “Shortlinks” by Pretty Link.
With an easy to remember Forwarding Link, you never need to search for your personal zoom room invite. It’s easy to remember and it helps to keep your brand consistent and top of mind.
If you schedule a Recurring Meeting or a Recurring Webinar (with the webinar plan) you can create a specific forwarding link that goes only to that specific meeting room, which is what we do for our recurring GLAM coaching calls.
Change your Zoom Name to Include a CTA or Brand Indicator
This is one you can have fun with!
Change your Zoom name that is displayed when others join the call. You can add in a Call To Action, or even just a little emoji that represents your brand.
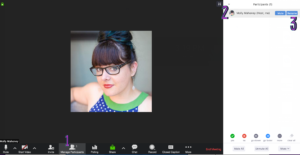
Follow this image below and go… 1.2.3.
- Click on Participants on the bottom of the screen.
- Then, click on your name on the right hand window that pops up.
- Next, click on the word Rename.
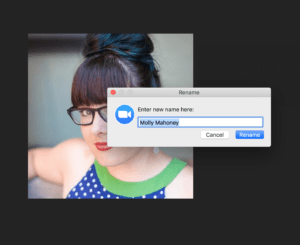
You’ll then see this…
Just plop your name in there – here I show how to use a specific CTA.
Once it’s changed you’ll see the name is updated on the bottom left hand side of your screen.
I added an emoji in this one to reinforce my Brand. (Our community is the “MollSTARS.” A name that they gave themselves ?)
Use Zoom Virtual Backgrounds to Stand Out
Many people are working at home unexpectedly, and that means they are holding meetings in their kitchens, living rooms, or even bedrooms. And that miiiight not be the most professional look. Haha. So, you can actually swap out your background – even without a green screen!
Check it out! So easy!
1. Click on the little ^ next to “Start Video”
2. Click on “Video Settings”
3. Click on Virtual Background.
4. Select Your Background
5. You may notice the edges of your face or hair are funky… so if you have a green-screen it will clean that up. Just be sure to select, I have a green screen on the bottom.
*Bonus: West Elm just created a bunch of Zoom Room Backdrops – which I think is GENIUS way to solve a problem while their brick and mortar shops are closed.
Add a Virtual Camera to your Zoom Meeting so you can adjust settings and use filters
I looove this one, and every single time I talk to clients or friends about how to use Zoom, I mention this one, because I don’t ever use Zoom without it! When you use virtual or external cameras with Zoom, you can adjust the exposure and white balance, zoom in or out, and even add filters.
My favorite virtual cameras are iGlasses by eCamm and the Snapchat SnapCamera. You can find my favorite external cameras on our Live Video Gear List.
Here’s how to select a different camera within Zoom.
1. Go to the ^ next to “Video Settings” on the bottom of the screen.
2. Select your camera. If you have a virtual camera or even and external camera connected to your computer, you can select it right there.
Give Zoom Meeting Participants Recording Rights so you don’t have to worry about sending later.
This is the one trick that most of my clients freak out about. It makes this soooo much easier!
1. Click on Participants on the bottom of the Zoom screen.
2. Hover over the name of the person you’d like to give access to.
3. Click “More” next to their name. (See image below)
4. Click “Allow Record.”
Co-host Zoom Meetings so that your team can help during the call
- Log into zoom.us
- Click on your photo or “my account” in the top right hand side of the screen.
- Click settings on the left side of the screen.
- You’ll find a million changes you can make to settings, one is the “co-host” this allows you to run the meeting without having to be a totally crazy multitasker!
Lock Your Zoom Meeting Room so you don’t have unexpected guests
Remember the awkward accidental Zoom meeting surprise guests I mentioned earlier? I’ve been on both sides of the meeting room, where I accidentally dropped into someone’s in progress meeting, and many times when others have accidentally joined my in progress meetings.
Luckily I’ve learned how to use zoom “Lock Meeting” features.
1. Click “Participants.”
2. Click “More” on the far bottom right hand side of the Zoom screen.
3. Click “Lock Meeting” Remember to unlock it if anyone leaves and needs to get back in!
Connect Apps in the Zoom Marketplace (ie: Connect to Otter.ai Export Transcriptions for Free)
Ok, honestly, I discovered this one while I was prepping for this training on how to use Zoom! Seriously awesome, and I’ve only just started playing with it.
There are sooo many possibilities. I’m going to show you the “Otter.ai” integration because I think it’s something everyone can use to transcribe their zoom calls for free.
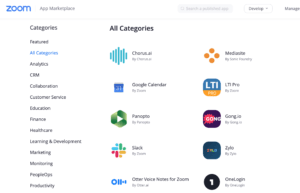
1.Go to the Zoom App Marketplace. You can find it in the “Advanced” settings. Or… use this link: https://marketplace.zoom.us/
- Search for the Otter.ai
- To set up, go to otter.ai > Account Settings > Connected Apps > Zoom accounts.
- Click on “Connect your Zoom account.”
- Return to your Zoom account and click “Allow” to grant Otter access to your recordings.
- Otter will sync and transcribe new cloud recordings! You’ll get an email notification after each video.
- Otter.ai will do 600 minutes for Free!
Go Live on Youtube and Facebook
There are some benefits for using Zoom to go live on Facebook and Youtube, and a few limitations.
Pros:
1. Screensharing is a breeze.
2. Multiple guests on screen at one time.
Cons:
1. You can’t see the comments on the screen.
2. No additional branding via a logo or frame.
3. No “lower thirds” on the bottom of the screen.
4. No adding in overlays or images.
5. It’s very tricky to pre-schedule videos.
So, the only reason I ever use Zoom to go live is when I want to be able to have more than 4 guests on the screen at one time. For example… We use zoom for our our weekly GLAM calls because we often have over 20 attendees and I want to make sure the recordings are live streamed into our group right away. I don’t need to see the comments, because our members are on screen with me.
We use Be.Live for live streaming on Facebook and Youtube because seeing comments, adding branding elements, and quickly prescheduling is a necessity for our live shows.
Here’s how to Go Live with Zoom.
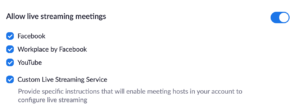
1. Make sure you have live streaming enabled on your account by going to the settings on your account.
2. Scroll down until you find “Allow Live Streaming Meetings”
3. Enable all possible ways to go live (you never know, and it’s just easier to have them all turned on.)
4. Open your Zoom meeting, webinar, or room.
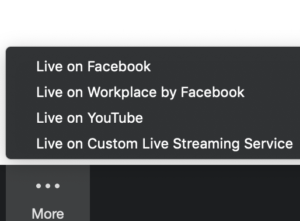
5. Click “More” on the far right on the bottom of the screen.
6. Select Your Live Streaming destination.
If you are planning on going live on Facebook, you actually don’t need to make any changes to your Facebook account or group settings.
If you are planning on going live on Youtube, keep in mind, that you’ll need to go into settings on Youtube and turn on Live Streaming. It will then take at least 24 hours before you’ll actually be able to go live.
7. One you select your destination, a new window will pop up where you’ll see a preview and you’ll be able to write your video description.
8. Click: Go Live
There are times when I get an error and I have to try again because it doesn’t connect properly.
I have about a 95% connection rate. So, if it doesn’t connect after 2 or 3 tries, know there are other live streaming options.
Become a BeLive Partner here: www.Molly.live/belivepartner




#nugget – zoom room – same link
I did know about the virtual background. Love it
Sherry Carriger Torres here it is!
#nugget – can connect with Apps like Otter to transcribe the call.
ZOOOMY
nugget
Watching replay from my tablet. Not get any sound. I have the volume all the way up.
Zoomy!
I’m catching the #replay. Thanks Molly Mahoney!!
ZOOMY please!
What a year this past week has been!
Thank you – I always love you!
Zoomy Thank you #replay
Zoom
ZOOMY
loved ZOOMY
#replay ZOOMY
#Replay fantastic idea this live!! ZOOMY
#nugget lock your zoom room
zomy
Molly, you rock!
Everyone thinks I live in a penthouse – reality is different
I have a hard time w my kids online classes, but I can’t imagine having to learn French too!!
My daughter love dance on zoom
Awww amazing!
Zoomie
Zoomy
ZOOMY.
Elevate
That’s available in Messenger’s video chat
Dumbazz of the year award ! Beware and be safe. The OP is under anticipated investigation. Every respondent is now, and will be forever more considered to be an accomplice to a felony probability of investigation and can anticipate a visit by an ISP Officer at our earliest convenience (usually anywhere from 2 to 3 hours but could be as long as 12 months or so due to Covid-19.) Said Officer will then place you under arrest and transport you to your local, county jail. If you are able to read this message, we advise you to seek legal council immediately if not sooner. It’s time to drain the Facebook swamp !